Manometer U-tube pressure gauge on radon mitigation system
Back to Blog
MitigationMarch 14, 202611 min read

Radon System Maintenance Guide: Keep Your System Working

A radon mitigation system is simple, reliable, and requires very little maintenance. But "very little" is not "none." Here is what to check, how often, and the warning signs that something needs attention.

Monthly
Manometer check frequency
$50-$100/yr
Electricity cost
5-12 Years
Typical fan lifespan
Every 2 Years
Retest recommendation

1. Why Maintenance Matters

A radon mitigation system protects your family by creating continuous negative pressure under your foundation. When the system is working, radon is pulled out of the soil before it enters your home. When it stops working, radon enters freely, and you may not notice for months or years because radon is invisible and odorless.

The good news is that radon systems are mechanically simple. There is one moving part (the fan), one measurement device (the manometer), and a passive pipe network. Maintenance is minimal but essential. Think of it like checking your smoke detector batteries: easy to do, easy to forget, and potentially catastrophic if ignored.

2. Monthly: Check the Manometer

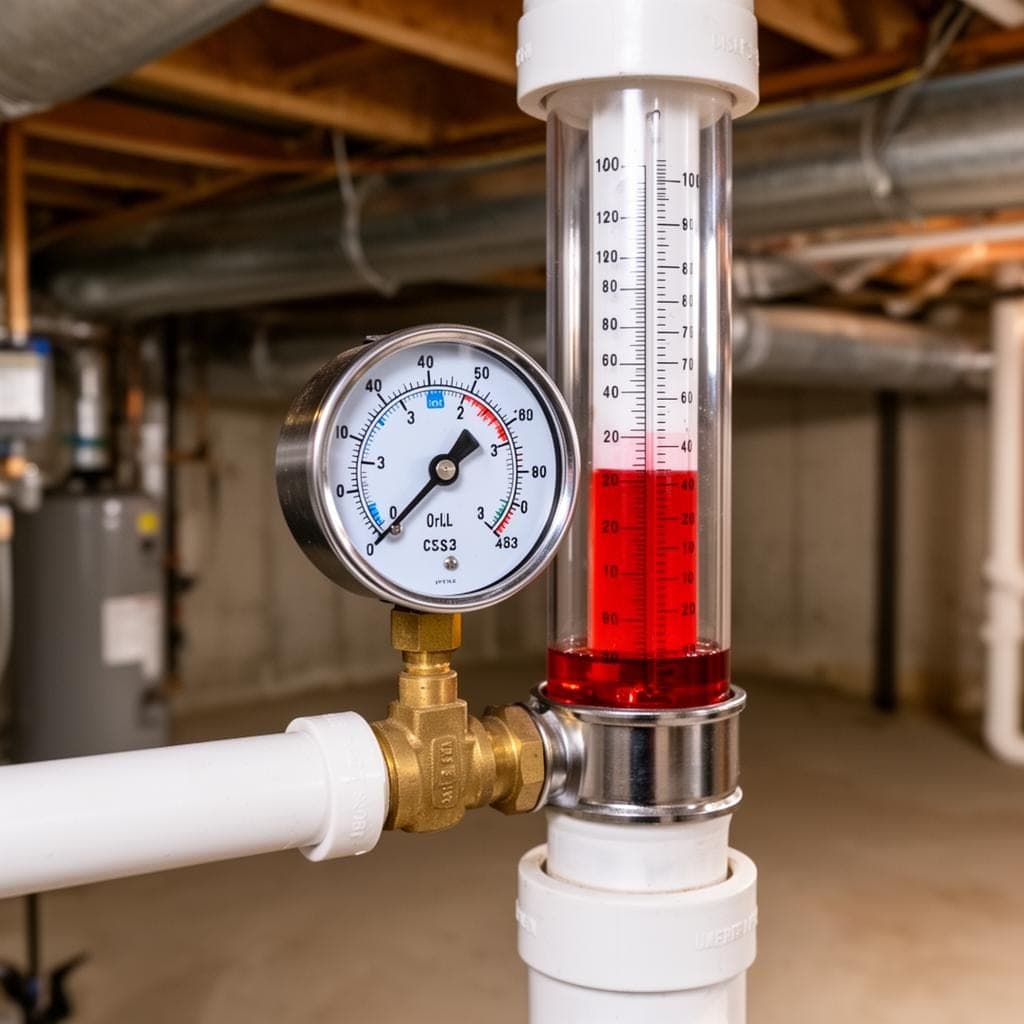
The manometer is the small U-tube gauge mounted on your radon vent pipe, usually in the basement or on the pipe where it exits the house. It contains colored liquid that shows whether the fan is creating suction.

How to Read It

Unequal fluid levels = system working. When the fan is running, one side of the U-tube is higher than the other. The difference does not need to be large. Even a small differential indicates active suction.
Equal fluid levels = possible problem. If both sides are level, the fan may have stopped. Check that the fan has power (circuit breaker, GFCI outlet). If power is on and levels are equal, the fan may need replacement.
No fluid visible = manometer needs refilling. The indicator fluid can evaporate over time, especially in hot attics. Refill with the original fluid (usually red gauge oil) or replace the manometer.

This check takes 10 seconds. Make it a habit when you change your HVAC filter or check your smoke detectors.

3. Listening for Fan Changes

A healthy radon fan produces a consistent, quiet hum (typically 30 to 55 decibels at the unit). Changes in sound are the earliest warning sign of fan problems.

Louder than usual: Bearing wear is the most common cause. The fan may work for weeks or months with noisy bearings, but replacement is coming.
Vibrating or rattling: The fan motor is becoming unbalanced. This accelerates bearing wear and can damage the pipe connections. Address soon.
Intermittent operation (cycles on and off): Electrical issue or motor overheating. The fan should run continuously, not cycle.
Silence: The fan has stopped. Check the manometer to confirm, then check power. If power is available and the fan is not running, it needs replacement.

4. When to Replace the Fan

Radon fans last 5 to 12 years depending on the brand and conditions. For a detailed guide on the replacement process, see our complete radon fan replacement guide.

Signs It Is Time

Fan has stopped running (confirmed by manometer)
Noise has increased significantly over the past few months
Manometer reading has dropped gradually (less suction over time)
Fan is more than 10 years old (proactive replacement)

Replacement Costs

ComponentCost
Fan unit only$150-$350
Professional installation labor$150-$300
Post-replacement radon test$125-$250
Total$400-$800

5. Annual System Inspection

Once a year, give your radon system a thorough visual inspection. Here is what to check:

Pipe connections. Check all visible PVC joints and couplings for cracks or separation. Temperature cycling can stress joints over time.
Exterior pipe condition. If the vent pipe runs along the exterior of the house, check for UV damage, weather deterioration, or physical damage from landscaping or storms.
Roof cap. The pipe exhaust at the roofline should be clear of debris, bird nests, or ice. A blocked exhaust reduces system effectiveness.
Foundation sealing. Check visible slab cracks and the area around the suction point. Cracks that have widened since installation should be resealed with polyurethane caulk.
Electrical connection. Verify the fan's electrical outlet is functional and the circuit breaker has not tripped. GFCI outlets can trip during storms.

6. Crawl Space Membrane Checks

If your system uses sub-membrane depressurization in a crawl space, the membrane requires periodic inspection.

Check for tears. Pest activity (rodents), contractor work (plumbers, electricians), and water intrusion can damage the membrane. Tears compromise the airtight seal.
Inspect edge seals. The membrane should be sealed to foundation walls and piers. Tape or caulk can degrade over time, especially in humid crawl spaces.
Look for standing water. Water on top of the membrane is normal during heavy rain. Water under the membrane that lifts or displaces it is a problem that needs professional attention.

Repair minor membrane tears with poly tape immediately. For larger damage or seal failures, contact a professional for radon system repair services.

7. Retesting Your Home

The EPA recommends retesting every 2 years, even with a functioning system. Here is why and when:

Every 2 years: Routine verification that the system is maintaining low radon levels
After fan replacement: Confirm the new fan is performing (test 24 to 48 hours after installation)
After major renovations: Adding a room, finishing a basement, or modifying the foundation can change radon dynamics
Before selling: Current test results demonstrate the system works and give buyers confidence

Simple and Inexpensive

Total annual maintenance cost for a radon system: $50-100 in electricity plus 5 minutes of your time per month checking the manometer. Fan replacement every 5-12 years at $400-800. A retest every 2 years at $125-250. That is the entire commitment for permanent radon protection.

8. Frequently Asked Questions

Keep Your Radon System Running

Professional maintenance, fan replacement, and retesting services.

Fan Replacement
System Inspections
Post-Service Retesting

Schedule System Maintenance

We respond within 24 hours
1
2
Your Information

Related Articles

Mitigation

Radon Fan Replacement Guide

Mitigation

What Is Sub-Slab Depressurization?

Mitigation

Radon in Crawl Space Homes

ER

Written by EraseRadon Atlanta

Experienced radon professionals serving Metro Atlanta since 2020. Our team provides professional radon testing, mitigation, and documentation support aligned with EPA guidelines and industry-standard protocols.

Last updated: March 14, 2026Learn more about EraseRadon

Radon Safety Resources

Expert insights and guides to keep you informed

View All Posts →
Where to Place a Radon Detector: Room-by-Room Placement Guide
TestingApril 29, 2026

Where to Place a Radon Detector: Room-by-Room Placement Guide

Exactly where to place a radon test kit or detector in your home. Room-by-room guidance for accurate results, including height, distance, and conditions.

Read more about Where to Place a Radon Detector: Room-by-Room Placement Guide
Installing Radon Mitigation Before Selling: Is It Worth the Investment?
Real EstateApril 29, 2026

Installing Radon Mitigation Before Selling: Is It Worth the Investment?

Should sellers install radon mitigation before listing? The ROI, buyer psychology, and strategic benefits of proactive radon mitigation before selling your home.

Read more about Installing Radon Mitigation Before Selling: Is It Worth the Investment?